Tuesday, February 21, 2012

Cupcakes

These are also for Chi's birthday. I got this idea from Bakerella's site. Her's are perfect (of course). But I think mine came out ok!

Supplies (I used)
- White and pink candy melts
- White M&Ms
- Lavender sugar sprinkles
But you can really use whatever you want to decorate these!

I still haven't figured out the right amount of cake to each cake pop. These are two cake balls combined, of the size that I normally make. My regular cake balls just didn't have enough muffin top.

Turtle

I made these for Chi's upcoming birthday. I hope they survive the mail.

Supplies
- White and green candy melts
- Royal icing eyes
- Lollipop sticks
- Styrofoam block
- Wax paper
- Clear treat bags
- Thin ribbon

Directions
-
Follow the usual steps to make cake balls. Bake, cool, crumble, mix, freeze, etc. You should know the deal by now!
-
To shape, I used my tablespoon measuring spoon. It was perfectly turtle-shell-shaped. For the heads, I just made little balls.
- Melt white candy and add green to make a light green dip (I used leftovers from Keroppi pop). I dipped the heads first, using a toothpick to prop the heads upright to dry. Be sure to add the eyes while the candy is still wet. Otherwise use a toothpick to dab and attach.
-
These were weird shaped and kinda heavy for the shape so I made them upside down pops. Melt green candy and throw the shells in. Using a spoon, cover the shell and try to drip off as much candy as you can. Slide off the spoon on to wax paper. Shove a stick in to the top of the shell. Push a head in to the front of the shell. Move to the fridge to dry.
- Once dry, bag and tie! These were too big to fit in the bags I had, so I just used saran wrap.


Rebecca Rabbit

This is another character from Peppa Pig. I think she's the cutest of them all. She sort of reminds me of Gianna's favorite stuffed animal, Bunbun.

iPad sketch

I love when I show Gianna a sketch and she knows right off the bat who it is. I'm asking her from now on because whenever I ask Tony, he's always wrong and it makes me feel like I am not doing a good job, lol.

Supplies
- White and yellow candy melts
- Pink confetti sprinkles (cheek)
- Pink chip sprinkle (nose)
- Glico Pretz sticks (ears)
- Royal icing eyes
- Black edible pen (mouth)
- Lollipop sticks
- Styrofoam block
- Clear treat bags
- Thin ribbon (although I only had thick blue ribbon)

Directions
- Make standard cake balls. Shape like an oval with one pointed tip. Freeze for 15minutes and transfer to the fridge.
- Melt white candy in 30second intervals. Add yellow candy until you get the color desired (she's sort of a cream/ecru/mother-of-pearl color). Dip lollipop in melted candy, insert in cake ball. Return to fridge in block to set.
- Break Pretz in to 1.5-2" pieces. Dip in cream colored candy. Set upright to dry (I used free holes in my Styrofoam block).
- Remove pops from the fridge. Poke two holes on top for the ears. Dip heads in cream candy. Insert Pretz ears. Push on a pink chip for the nose. Push on two pink confetti sprinkles for the cheeks. Push on two eyes. If the candy sets before you do all this, use a toothpick to dab the decoration and attach.
Return to fridge in block to set.
- Once dry, draw on the mouth with the black edible pen.
- Let the cake pops come to room temperature, bag and tie.

Jeremy Lin aka JLin

#linsanity has hit cake pops.

Quick background: Jeremy Lin played on the Golden State Warriors last year. Pretty much a bench warmer that they'd put in at the end of the game if the team was hella losing or hella winning. That's nice... giving him some action. They'd constantly send him to the D-League and then pick him back up. I felt bad for the guy. He is a Harvard grad. He deserves better than that! Maybe the Warriors were just jealous that he was smarter than the whole team combined. This season, he was dropped by the Warriors, pick up by the Rockets (or whoever is in Houston), dropped by Houston, then picked up by the New York Knicks where is he is have a Knick-ass season (harharhar). The media around him is seriously crazy right now. Thankfully, his last name is easily incorporated in to everyday common words to further the buzz around him (lincredible, linsanity, linning, etc.). And I must mention, that before his rise to fame, he's had a constant fan - Linh Hoang (@DrFoodie - seriously, check out her stalker-eque tweets, aka "twirting" to him, haha!). Her love for him has grown exponentially and it was she that requested these cake pops. She even came over to help!

The Inspiration

iPad sketch

Linh had a great idea - instead of just doing his head and making your average Asian-man cake pop, we should do basketballs and jerseys too! Thank god his name is three letters and the letters are all straight ones.

Supplies
- White and orange candy melts
- Black candy color (hair)
- Brown jimmie sprinkles (optional)
- Jumbo peach confetti sprinkles (Gianna helped me sort these out, I let her eat the broken ones!)
- Black edible pen
- Orange sugar sprinkles (optional)
- Lollipop sticks
- Styrofoam block
- Ziplock bags
- Clear treat bags
- Thin ribbon

Directions
- Make your standard cake balls. For the head, shape it in an oval. For the jersey, shape in to an oval, flatten and taper with your fingers. Freeze for 15minutes and transfer to the fridge.
For the head
- Melt white candy in 30second intervals. Add orange candy until you get the color to match the jumbo confetti.
- Dip lollipop stick in candy, insert in pop. Dip jumbo confetti and push in to the sides for the ears. Return to fridge in block to set.
- Once dry, dip in peach colored candy. If you decide to use brown jimmies for the hair, dip the pop now before the candy sets. Return to fridge in block to dry.
- Melt white candy in a ziplock bag. Snip a tiny piece of the corner and pipe on his million dollar smile. You can also do this ahead of time on wax paper - but remember to attach after you dip his head in the peach candy.
- Draw on his eyes and nose with the black edible pen. I was thinking about cutting a peanut butter chip in half and attaching for the nose, prior to dipping, but I forgot. Oh well.
- Let the pops come down in room temperature, bag and tie.

The one with jimmies kind of looks like Flynn Rider from "Tangled"

For the basketballs
- Melt orange candy. Dip lollipop stick and insert in cake balls.
Return to fridge in block to set.
- Once dry, using the black edible pen, draw lines. Use a basketball for reference as describing is a lot of confusing work. You know you have a basketball lying around. Or google it. Haha
- For the DTM (doing too much) touch, write on "NBA"
-
Let the pops come down in room temperature, bag and tie.

For the jerseys
- Melt white candy. Dip the lollipop stick and insert in the jersey shaped cake.
Return to fridge in block to set.
- Once set, dip the jersey in white candy. Be careful as the shape of the jersey makes the cake unstable. I had my husband hold them upright for me for a few seconds and kind of jiggle them in upright position if they started to bend.
Return to fridge in block to set.
- Melt some candy in a ziplock bag or use leftover candy. Snip a tiny piece of the corner and pipe on the details of the jersey. "NY 17" on the front (couldn't fit NEW YORK).
If you want that extra bling, sprinkle the orange sugar sprinkles on the 17. Return to fridge in block to set.
- On the back of the jersey, pipe 17 again.
- Once all the piping has dried, draw on the details of the jersey - the arm holes, the neck hole, and "LIN" on the back above the piped 17.
-
Let the pops come down in room temperature, bag and tie.
I must say, these turned out a lot better than I had originally imagined. They are definitely the most work but I think it was worth it. And Linh loved them (she had a hard time eating them - how could you bite the face of the man you love?!).

Would I do it again? Probably not. So enjoy everyone! Or should I say #linjoy haha

Peppa Pig


Pehhhhp-pa Pig! OINK!

Yet another find of Gianna's on YouTube. She loves Peppa Pig and this is currently her go-to show to watch. In fact, she watches it so much that's she's sort of picking up a British accent! Hilarious.

These were hard to make because Peppa Pig is a 2D cartoon. She barely turns and I don't think I've ever seen a frontal view of her face. Her two eyeballs are always on one side which makes making 3D cake pops pretty difficult. She's pretty cute. And annoying. And thanks to my sister, I kinda see something that is totally inappropriate now.

iPad Sketch (I draw pretty cute!)

Supplies (different than what's noted in my sketch)
- White and pink candy melts
- Pink confetti sprinkles (I used the large ones but now after the fact, I think the small ones would have been better)
- Royal icing eyes
- Tic Tacs (ears)
- Black edible pen (I would've used pink but I only have black)
- Lollipop sticks
- Styrofoam block
- Clear treat bags
- Thin ribbon

Directions
- Make standard cake balls. Shape a snout by pulling some of the cake outwards and then rolling the cake back in to a ball. Freeze for 15minutes and transfer to the refrigerator.
- Melt white candy in 30second intervals. Add a pink candy until you get the desired color. I don't remember what ratio I used (I suck).
- Remove cake balls from the refrigerator. Dip lollipop stick in melted candy and insert in cake balls. Dip two Tic Tacs in candy and insert on top for the ears. Return to refrigerator on a Styrofoam block to dry.
- Once all cake balls are stick-ed (?), remove some pops and dip in pink candy. Before the candy dries, put on two eyes and the cheeks. If it dries before you get a chance to do this, dab candy on to the decoration with a toothpick and put on. Return to the refrigerator to dry.
- Remove the cake pops from the refrigerator and draw on the mouth with the black (or pink, if you have it) edible pen. Draw two dots on the snout for the nose. Wait for the cake pops to come to room temperature (not cold to the touch), bag and tie with ribbon.

Don't mind the one in the back. She got the leftover melted candy and I didn't want to melt more, haha.


I don't really like the way these turned out. My cousin said she looks drunk. I think she kinda looks like the creepy pig from the Saw movies. I'll definitely have to redo these when I get a chance.

Pankunchi

I put out a message on Twitter and Facebook for cake pop requests and not many people replied to me. I haven't built up my cake pop street cred yet, haha. A friend did request Pankunchi cake pops. I originally thought he had spelled Pikachu (you know, from Pokemon) wrong, but it's actually a Sanrio character that is really cute. He steals bread. C'mon - how adorable is that?

iPad Sketch

Supplies
- White candy melts
- Brown plain M&Ms (halved, for ears)
- Black edible pen (eyes, nose and mouth)
- Lollipop sticks
- Styrofoam block
- Clear treat bags
- Thin ribbon

Directions
- Make standard cake pops, semi-flatten to an oval. Put in freezer for 15minutes to firm up. Transfer to refrigerator.
- Melt white candy. Remove some cake ovals. Dip lollipop stick, insert in cake. Return to refrigerator in a Styrofoam block.
- Once they're all set, remove cake pops and dip in white candy to cover. Before the candy sets, push in two ears. Return to block to dry.
- When all the cake pops are dry, use a black edible pen to draw on the eyes and mouth.
- When the cake pops are no longer cold to the touch, bag and tie with ribbon.

I actually had to use saran wrap for these guys because their heads were too wide and the black pen kept smearing (so annoying). I really like the way saran wrap looks. What the hell am I going to do with all my treat bags now? LOL


Monday, February 13, 2012

Gummibär Cake Pops

Gianna is the YouTube queen and a while back she had discovered a super annoying but super infectious video of a singing green gummy bear. Watch it here, if you dare.

My coworker's son loves this thing and his birthday party is this weekend, so I decided to try making cake pops. I started by thinking up a design on paper. Upon showing Gianna, she knew exactly what I was trying to go for. Tony, on the other hand, guessed a bunch of different things - including a clown, lol. I can kinda see that...

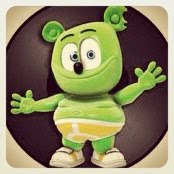
Here's what Gummibar really looks like

Here are the things I used (if you can't see in the sketch):

Other things you'll need:

  • Styrofoam block
  • Ziplock bags
  • Picture of Gummibar (for reference)
  • Lollipop sticks
  • Clear treat bags
  • Thin ribbon

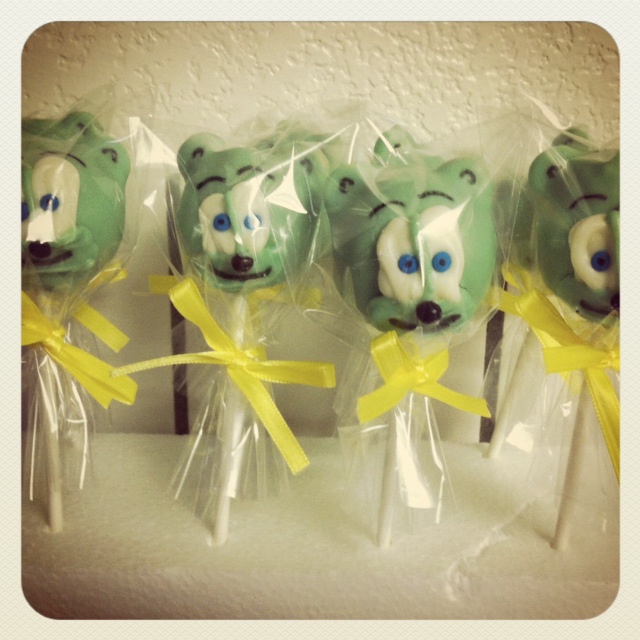
Pretty standard cake pop. Roll the balls, freeze to firm up. Transfer to refrigerator. Melt white candy melts and add a couple of green melts until you get the color you are happy with (I forget the ratio I used). Remove some cake balls from the refrigerator and poke holes at the top, dip the Smarties in the candy and insert in each hole. Dip a lollipop stick and poke at the bottom of the cake pop, return to refrigerator (use a Styrofoam block to keep the cake pops standing).

Once the stick and ears have set, remove the pops from the refrigerator to take the chill off of them, about 10min or so. Remelt the candy if needed. Dip each cake pop and cover with candy. Return to the Styrofoam block to dry.

After all cake pops have been dipped, transfer the rest of the melted green candy to the corner of a Ziplock bag. You can use a piping bag here, but I'm cheap and didn't want to waste mine. Using a Ziplock bag worked - squeeze everything in to the corner, twist the bag to hold it there and use some tape to secure it.

To make the eyes, put some white candy melts in a Ziplock bag. Use the same method as above to set it up. Pipe the eyes, using the picture reference. Before the white piping dries, add the blue confetti pupils to each eye. If the candy dries before you get a chance to do this, use a toothpick to dab the cake pop and add the details.

Back to the green candy in a Ziplock bag - snip a small piece of the corner off and start at the top of the eyes, draw a line down the middle to divide the eyes and then down to pipe the beard area of the Gummibar. Keep a picture nearby for reference. Ddd the black chip for the nose. Return to Styrofoam block to dry.

Once everything has dried, draw the eyebrows above the eyes. Draw the mouth in the beard area. Draw details on the ears.

Bag, tie, and VOILA! You've got some cute Gummibar pops! Thank god they can't sing ;)


Saturday, February 11, 2012

Orange & "Gray" Wedding Cake Pops

Lan and Kush are getting married in July. I saw a wedding cake pop on Bakerella's site that were way cute (of course). Their wedding colors are orange and gray so I tried to make a wedding cake pop using these colors.

I went to Joann's the other day (I had coupons that were expiring so I just had to use them). I didn't find anything grey but I did find silver dust and some brushes. I had orange decorating icing already (on clearance at Target after Halloween - damn red tags get me every time). I used round fondant cutters that I already, the two smaller circles, to shape the base and top of the cake.

They turned out really crappy. I somehow got the first heart to look nice. The rest just look like blobs. Meh, I tried.


And of course, you gotta bag and tie the pops off as the finishing touch to help hide how crappy your pops really look!

Friday, February 10, 2012

Hello Kinda-Kitty Cake Pops

Upon perusing Bakerella's site, I came across her Hello Kitty cake pops. We're going to a Hello Kitty themed birthday party this weekend so I thought it was the perfect opportunity to try these out. First off, WHY don't I ever listen to instructions and WHY do I always think I'm smarter than the system and try to come up with my own ideas of what I THINK might be easier but it always ends up being harder/more work/less cute? Ugh. I hate myself sometimes...

Here are what Bakerella's redonkulously cute Hello Kitty pops look like

Ugh. Just ugh. They are too perfect!

You can find directions on how to make the Hello Kitty cake pops here. My changes included using black confetti for the eyes (mine came in a Halloween sprinkle set) and yellow jumbo nonpareils for the nose.

Here's how mine turned out
Yes, one is crying. She was double-dipped because her first coat is not smooth (it's hard dipping candy with two toddlers at your side - either pulling your pants down or poking their grimy little fingers in your chocolate...)

A couple of things - I wish I would've just drawn on the eyes. Hello Kitty's eyes are oval and my sprinkles were round. I should've added the details while the white chocolate coating was still wet to avoid the (as my sister called it) weepy eye look - yenno, like you just said something mean and she's about to cry but is holding back her tears.

Other than that, they turned out pretty nice for something I decided to do in one night. These will be given to a 7 year old anyway. She's not gonna care what they look like, just that they taste good (I used Funfetti cake mix with vanilla frosting). Maybe one day, I'll do these again. When the kids aren't home, hehe!


They look much better packaged!
Clear treat bags do an awesome job at hiding flaws.

Wednesday, February 8, 2012

Mickey & Minnie Cake Pops


Noah turned 2 in January and we threw him a Mickey Mouse Clubhouse themed party! I tried to do the Oreo pops first and failed terribly. I somehow came across Bakerella's version of a Mickey Cake Pop and used her silhouette version and came up with my own design based on the failed Oreo pop design.

This is what the Mickey Pop was supposed to look like

This is what my Oreo pop looked like... FAIL!

My biggest mistake was trying to color my dark cocoa candy melts with black icing color. Here, I thought that I was such a genius thinking that using a dark candy melt would need less black coloring. Only thing is, icing color has water in it and everybody should know that chocolate + water = one hot mess. The candy just kind of coagulated and got a tough, sandy texture. I tried to add vegetable oil. No help. So I gave up. I also didn't adhere the mini Oreos to the big Oreo, so every time I tried to dip in the candy melt, they just fell off. (Talk about annoying... Not only are you searching in a pot of melted chocolate for two mini Oreos, your fingers also come out dyed! Use chopsticks, people.)

So I took a break. Decided that the Oreo pops weren't gonna be the way to go and decided to make Mickey Cake Pops instead. I thought they were going to be way too hard, but turns out they are so easy to make! It's time consuming to decorate but I think it's worth it. Everyone loved them - but at the same time found themselves in the predicament of whether or not they should eat something "so cute!"

What you need:

- 1 box of cake mix
- about 3/4 of can of frosting
- white candy melts
- red candy melts
- dark cocoa candy melts
- Crisco or shortening
- candy coloring (non-water based coloring)
- mini Oreos or mini nutter butters (split and creams removed)
- lollipop sticks (any length, I used 4")
- styrofoam block
- white decorating icing and small round tip
- jumbo heart sprinkles
- clear treat bags
- thin ribbon

Directions:

1. Bake the cake according to package directions in a 13x9 pan. Let it cool and then crumble with your hands or an electric mixer. Add about 3/4 of the canned frosting and mix until combined. If the mixture is too grainy, add more frosting until you get the mixture to a consistency where it stays together when you make a ball.

2. Using a mini cookie scoop, scoop your mixture and put on to a baking sheet (use foil or parchment paper for easy cleanup). Scoop as many as you need. Roll the scoops into balls and put them in the freezer for about 10-15 minutes. Transfer to the refrigerator to keep the balls firm and cool.

3. Place candy melts (either white or dark cocoa) into a microwave safe bowl or cup. I used a whiskey cup with a wide mouth because I figured I'd have to melt the least amount of candy this way (more width, more candy). Melt at 30 second intervals until the candy is smooth and drips from a spoon. Add a little bit of Crisco or shortening and mix until well blended.

4. Remove a few cake balls from the refrigerator. Using the back of a spoon handle (or something thin and narrow), poke holes on both sides of the cake ball. Dip a mini Oreo into the melted candy and insert in the cake ball. Stick a lollipop stick at the bottom of the cake ball and return to the refrigerator, using a styrofoam block to keep the sticks upright. Do this for all your cake balls.

Decorating Mickey Pops
a. Melt red candy in a shallow bowl or cup. Remove a few cake balls (with ears attached) and take out the lollipop stick. Dip the ball about half way down in red candy. Dip the stick in the red candy and poke back in the cake ball. Put back in the refrigerator. Continue until you've made as many Mickey pop as you need.

b. Melt dark cocoa candy in a bowl or cup, wide enough where the ears can easily fit during dipping. Add black candy
color until you get black candy (I didn't try this using white candy, but from Bakerella's site, it might be a better way to go because my dark cocoa tinted black still looked a little brown). Make enough to cover both Mickey and Minnie pops! Remove some pops from the refrigerator and dip down until the candy meets the red candy. Return to refrigerator. Repeat for the remaining Mickey pops.

c. Once the Mickey pops have been fully covered, add the white buttons to his pants using white decorating icing and a small round tip. I used Wilton (the easiest way for me) but you can also use melted white candy. Apply two white dots to the front of the cake pop (choose the prettier side of the pop as the front). Repeat for the remaining Mickey pops and VOILA! You've got Mickey cake pops!

Decorating Minnie Pops
a. Melt white candy with a few red candy chips in a shallow bowl or cup. Keep adding red or white until you get the right pink for Minnie. Remove a few cake balls (with ears attached) and take out the lollipop stick. Dip the ball about half way down in pink candy. Dip the stick in the pink candy and poke back in the cake ball. Put back in the refrigerator. Continue until you've made as many Minnie pop as you need.

b. Reheat the black candy you made earlier. Remove some pops from the refrigerator and dip down until the candy
meets the red candy. Return to refrigerator. Repeat for the remaining Minnie pops.

c. Once the Minnie pops have been fully covered, add the white dotsto her skirt using white decorating icing and a small round tip. Apply white dots all over the pink candy. Repeat for the remaining Minnie pops.

d. Apply a dot of icing to each ear on the inside of the ear and apply two jumbo hearts. Squeeze a dot of icing
between the two hearts to connect them. Repeat for the remaining Minnie pops. Here she is!

To Package
Make sure the pops are at room temperature when you bag them, otherwise they will sweat and create a sticky film on the bags (not very nice looking). Not a big deal, but if you've got OCD like me, it'll bother you.

Cover each pop with a clear treat bag. Cut thin ribbon and tie around each pop. I used a Mickey paper cutter to cut some printed cardstock. I used a mini hole-puncher (1/8") and punched a hole out to attach a label to my pops for Noah's birthday. Here's the finished product: