Friday, March 30, 2012

Dora & Friends - Stars

Supplies I used:
- Green, pink and blue candy melts
- Royal icing eyes
- Green, red and blue edible ink pens
Template

Directions:
- Shape cake in to stars. You can use a cookie cutter but I like to freehand shape. Freeze to firm up.
- Melt each candy color and dip the lollipop stick. Let dry completely. Dip the cake pop and attach the eyes. Let dry. Repeat for all colors.
- Once dry, use the coordinating edible ink pen to draw the eyebrows and eyelashes (on the pink star). Use the red edible ink pen to draw the smiles.

Dora & Friends - Backpack

Supplies I used:
- Purple, white, yellow and red candy melts
- Black edible ink pen
Template

Directions:
- Shape cake in to a rounded rectangle. Freeze to firm up.
- Melt purple candy. Insert lollipop stick and let dry completely.
- Melt yellow candy and pipe eyebrows. You can use the template above. Set aside. You could probably use yellow jimmies here.
- Melt white candy and pipe eyes, long ovals. Set aside.
- Melt red candy and pipe the mouth. Set aside. You could use a red edible ink pen to draw on at the end and skip this.
- Remelt purple candy if needed. Dip the cake pop. Attach eyebrows, eyes and mouth. Let dry.
- Once dry, use a black edible ink pen to outline the eyes and mouth. Freehand draw the opening of the backpack and straps on the back.

Dora & Friends - Boots

Supplies I used:
- Blue, pink, red and white candy melts
- Jumbo confetti sprinkles (any color, broken in half for ears)
- Black edible ink pen
Template

Directions:
- Shape cake, using the template above as a reference. Freeze to firm up.
- Melt blue candy. Insert lollipop stick. Attach ears on both sides. Let dry completely.
- Pipe blue hair using the template above, on wax paper. Let dry.
- Dip the cake pop in blue candy and attach the hair.
- Melt white candy and circles for the eyes. You can use the template as an outline OR use white confetti sprinkles.
- Melt red candy and pipe the mouth, let dry. You can skip this step and use a red edible ink pen to draw on at the end.
- Melt pink candy. Use a toothpick to fill in the face and inner ear. Attach the eyes and mouth. 
- Once dry, use a black edible ink pen to outline the eyes, draw nostrils, and outline the mouth.

Dora & Friends

Fefe's 3rd birthday was over the weekend and her mama asked me to make cake pops for the party. I've done Dora heads in the past but for the party I decided to expand and do some of the cast too.

I made the Dora heads exactly the same except I added two brown jimmies to the top to add her flyaway hair. DTM, at its finest!
 

Tuxedo Sam

Supplies I used:
- White and blue candy melts
- Pink mini hearts (bow)
- Pink mini confetti sprinkle (bow)
- Yellow rainbow chip sprinkle (nose)
- Orange confetti sprinkles (feet)
- Jumbo heart sprinkle (broken in half, arms)
- White M&M (hat)
- Black and pink edible ink pen

Directions:
- Shape cake to an oval and flatten one end. Freeze to firm up.
- Melt blue candy. Insert the lollipop stick and arms on each side. Let dry completely. Dip the cake pop in blue candy and attach the yellow rainbow chip for the nose. Attach the white M&M off to one side. Let dry.
- Melt white candy. Use a toothpick to fill in the belly. Attach the orange confetti sprinkles at the bottom for the feet. Assemble the bow and attach. Use a toothpick to dab and attach if the candy has already set.
- Use a black edible ink pen to draw the eyes. Use a pink edible pen to draw a rim around the M&M.

Spotty Dottie

Supplies I used:
- White candy melts
- Pink jumbo heart sprinkles (bow)
- Orange mini M&M (bow)
- Black edible ink pen

Directions:
- Shape cake in to a ball. Freeze to firm up.
- Melt white candy. Insert lollipop stick and let dry completely.
- Pipe ears (use a picture for reference or print a picture and trace), let dry. Set aside.
- Dip cake pop and attach dried ears to each side.
- Use a toothpick to dab and attach the orange mini M&M to the jumbo hearts to create the bow. Dab the cake pop and attach.
- Use a black edible ink pen to draw on the eyes and nose. Draw spots all over the ears.

Pochacco

Supplies I used:
- White candy melts
- Black licorice (hair and ears)
- Black edible ink pen

Directions:
- Shape cake in to an oval. Squeeze in the sides a little to create the mouth area. Freeze to firm up.
- Cut black licorice to create the ears and hair. Set aside.
- Melt white candy. Insert lollipop stick and let dry completely. Dip the cake pop in white candy. Attach the ears (as pictured above, classic Pochacco has one up, one to the side). Attach the hair.
- Once dry, use a black edible pen to draw the eyes and nose.

Pekkle

Supplies I used:
- White candy melts
- Yellow Starburst (beak)
- White jimmie sprinkles (hair)
- Black edible ink pen

Directions:
- Shape cake ball by squeezing in the sides a little to create the mouth area. Freeze to firm up.
- Melt yellow Starburst in the microwave for 10sec. Pinch a small piece off and shape the beak. Set aside.
- Melt white candy. Insert the lollipop stick and let dry completely. If you want to pipe the hair (like I did above), pipe white candy on wax paper and let dry. 
- Dip the cake pop in white candy. Attach hair (piped or jimmies) to the top of the cake pop.
- Use a toothpick to dab candy to the front and attach the beak.
- Use a black edible ink pen to draw eyes and eyebrows.

My Melody

Supplies I used:
- White and red candy melts
- Candy corn (ears)
- Yellow rainbow chip confetti (nose)
- Yellow daisy sprinkle 
- Black edible ink pen

Directions:
- Shape cake in to an oval. Freeze to firm up. Trim candy corn at the bottom for the ears. Trim the side of each candy corn to create one straight edge. Set aside.
- Melt red candy. Insert a lollipop stick. Dip the candy corn and let dry. Dip the cake pop in red candy and attach the candy corn. Let dry. Use a toothpick to dab red in the center of the yellow daisy. Set aside.
- Melt white candy. Use a toothpick to fill in the face. Attach a yellow rainbow chip sprinkle for the nose.
- Dab the side of one ear and attach the daisy.
- Once dry, use a black edible ink pen to draw the eyes and smile.

Monkichi

Supplies I used:
- Peanut butter, white and orange candy melts
- White confetti sprinkles (eyes)
- Pink confetti sprinkles (cheeks)
- Peach jumbo confetti sprinkles (ears)
- Black edible ink pen

Directions:
- Shape cake in to flattened circles. Freeze to firm up.
- Melt peanut butter candy. Insert lollipop stick and let dry completely. Dip cake pop in candy and insert peach jumbo confetti (broken in half) to each side for ears and let dry.
- Melt white and orange candy to create peach. Use a toothpick to fill in the face. Attach eyes and cheeks. Let dry.
- Use a black edible ink pen to draw pupils and outline the eyes. Draw a small circle for the nose.

Little Twin Stars

Supplies I used:
- White and orange candy melts
- Fondant (hair)
- Teal and pink icing color (hair)
- Black edible ink pen

Directions:
- Shape cake in to ovals. Freeze to firm up.
- Roll out a quarter size of fondant and add pink color. Knead until even. Set aside.
- Roll out a smaller ball of fondant and add teal color. Knead until even. Set aside.
- Melt white and orange candy color to create peach. Insert lollipop stick and let dry completely. Dip the cake pop in candy and let dry.
- Pinch out a small piece of each fondant ball to use for the hair peak. Flatten the fondant enough to drape over the cake pop. For the boy, let it fall against the back of the cake pop. Use a lollipop stick to create the border around the hair. Roll the reserved piece of fondant in to a strip and fold in half. Stick on one side of the top of the head. Repeat with the pink fondant and let the hair fall below the cake pop.
- Use black edible ink pen to draw on eyes and smiles.

Chococat

Supplies I used:
- White candy melts
- Black candy color
- Black rainbow chip confetti (nose)
- Candy corn (ears)
- Black licorice (whiskers)
- Black edible ink pen

Directions:
- Shape cake in to ovals. Freeze to firm up. Trim bottom of candy corn to create ears.
- Melt white candy and add black candy color. Dip lollipop stick and insert. Attach ears with melted candy and let dry completely. Dip cake pop in black candy, attach black rainbow chip for nose and let dry.
- Pipe white candy in to circles for the eyes on wax paper.
- Cut black licorice in to thin strips or use licorice rope. Cut to size for whiskers, set aside.
- Use a toothpick and dab the front and attach eyes. Dab the cheeks and attach whiskers.
- For the ears, you can either dab white to create the inner ear or use a piece of confetti broken in to a triangle shape and attach. (I just happened to have pieces of confetti laying around and wanted to use them)
- Use black edible ink pen to draw pupils.

Badtz Maru

Supplies I used:
- White candy melts
- Black candy color
- Candy corn (hair)
- Yellow Starburst (beak)
- Black edible ink pen

Directions:
- Shape cake in to ovals. Freeze to firm up. Trim three or four pieces of candy corn for the hair by cutting the bottom off.
- Melt white candy and add black candy color. Insert a lollipop stick and attach hair using melted candy. Let dry completely. Dip the cake pop in black candy and let dry.
- Pipe white candy in to circles for the eyes on wax paper, let dry. Cut the top off to create a straight edge on top.
- Melt yellow Starburst in the microwave for 10sec. Shape the beak. Set aside.
- Use a toothpick to dab the front to attach the eyes and beak.
- Use a black edible ink pen to draw pupil and sad face on the beak.

Sanrio Cake Pops

Everyone knows about Hello Kitty. Every Asian girl knows about the rest of the Sanrio characters!

I remember traveling with my parents for work to SoCal when I was a kid. After they were all done with work, we'd go to Bolsa (super Asian mall in Westminster) with $20 and went wild. Literally just ran around the mall alone (well, without our parents) for hours. Times have definitely changed as I can't even let my kids out of my sight for more than 5min without freaking out! And to think, we didn't even have cell phones, texting, or even PAGERS at the time. How the hell did my parents handle it?! Crazy.

Pete

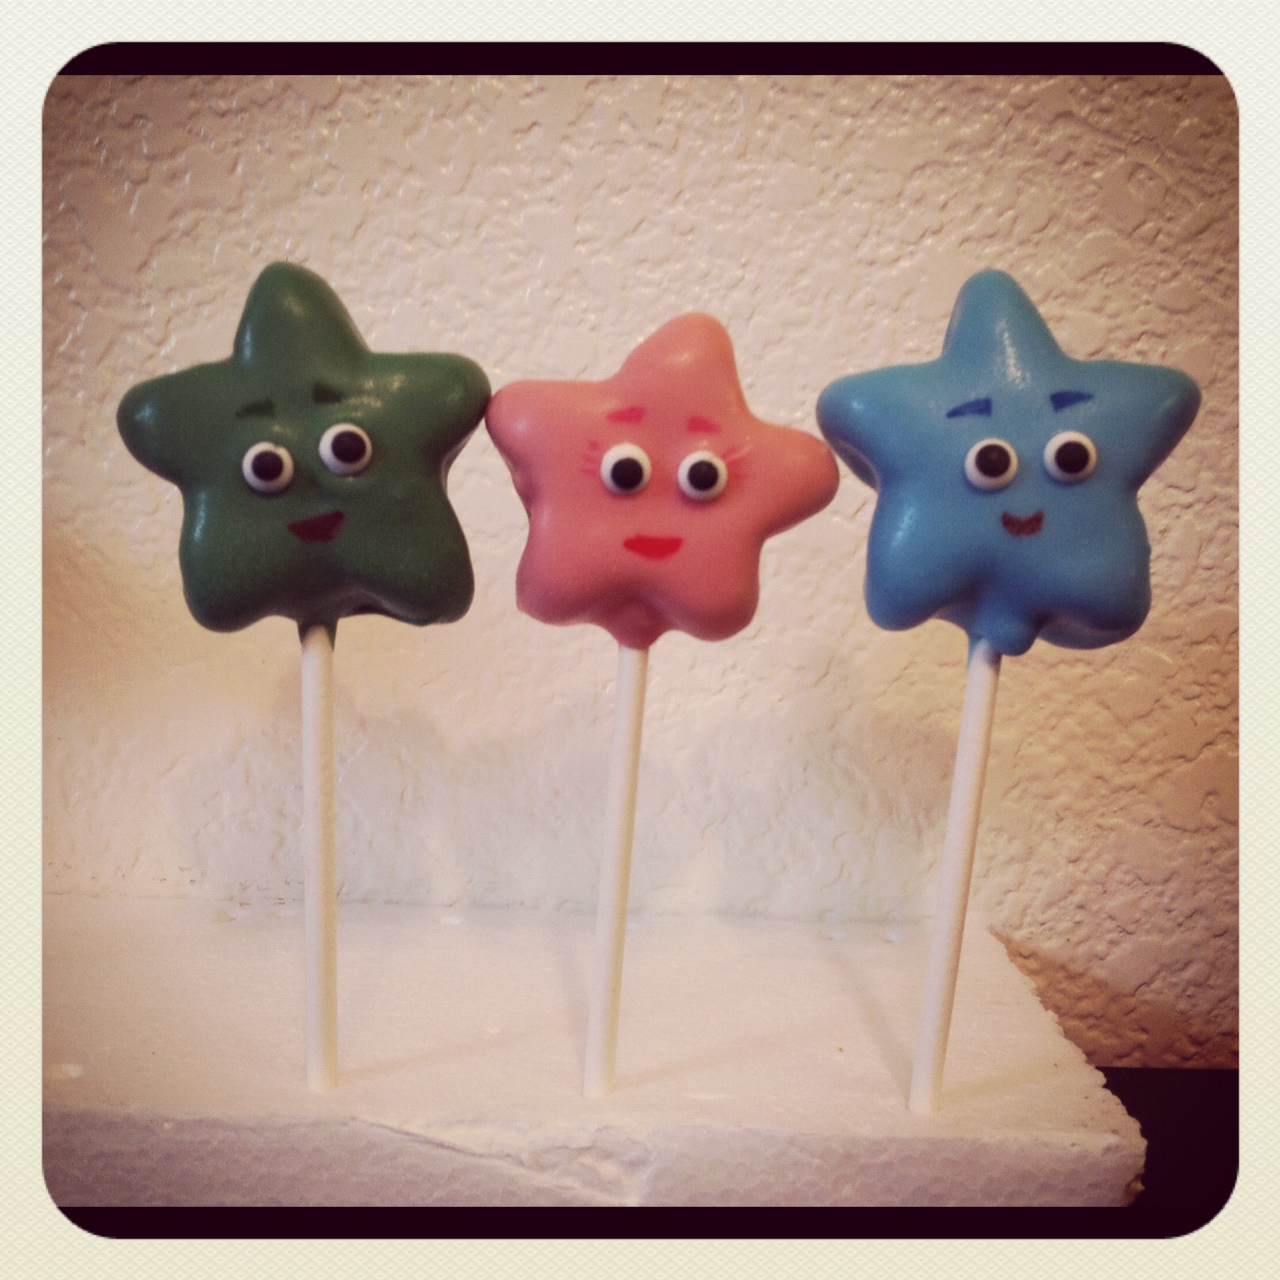
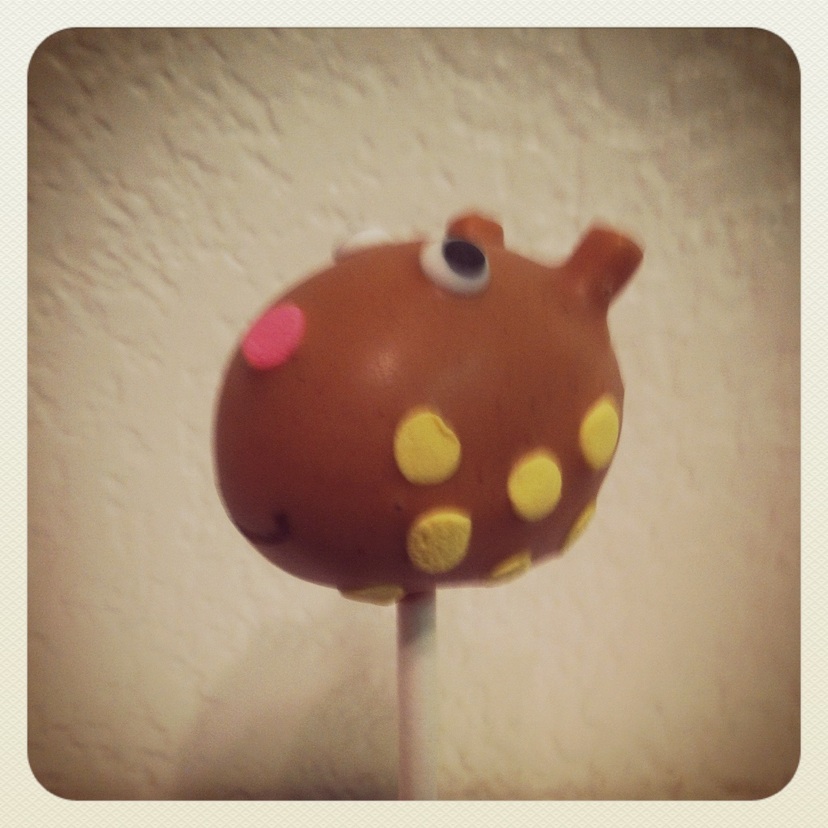
Really, this is not even worth blogging about because it doesn't look like Pete and is totally incomplete... But forget that, I put work in to this cake pop nonetheless!

Supplies I used:
- White and orange candy melts
- White and black confetti sprinkles (eyes)
- Black rainbow chip confetti (nose)
- White confetti sprinkles (teeth)
- Black edible ink pen

Directions:
- Shape cake like Pete's head, kind of like a pear. Freeze to firm up.
- Melt white candy and add black candy color. Insert lollipop stick in cake and let dry. Dip the cake pop and let dry completely.
- Melt white and orange candy to create peach. Use a toothpick to fill in the mouth area. Attach a black rainbow chip sprinkle for the nose.
- Use a toothpick to dab and attach white confetti sprinkles for the eyes. Dab the bottom of the white confetti sprinkle and attach the black confetti sprinkles for the pupils.
- Use a black edible ink pen to draw a smile.
- Break two white confetti sprinkles to create a straight edge. Dab candy and attach teeth.

If you watch Mickey Mouse Clubhouse, you'll know that this barely looks like Pete. I forgot his hair, lol. You can pipe his hair on wax paper and let it dry and then attach to his head right after you dip the cake in black candy. Or you can use a toothpick to dab on gobs of candy to create hair. I still haven't perfected the toothpick dabbing technique yet so pipe and dry works better for me.

Clarabelle

Supplies I used:
- White, orange and yellow candy melts
- Black candy color
- White and black confetti sprinkles (eyes)
- Pink confetti sprinkles (nostrils)
- Black edible ink pen

Directions:
- Shape the cake to resemble the head (bell shaped). Shape the bow. Freeze to firm up.
- Melt white candy and color with black candy color. Insert a lollipop stick and let dry. Dip the cake pop and let dry completely.
- Melt yellow candy and dip the bow. Set aside to dry.
- Melt white and orange candy color to create peach. Use a toothpick to fill in the mouth area. Let dry.
- Use a toothpick and dab for the eyes, attach white confetti sprinkles. Dab the bottom of the white confetti sprinkles and attach the black confetti sprinkles to create pupils. Dab the front of the cake pop and attach the pink confetti sprinkles to create nostriles. Dab the top of the head and attach the bow, hold in place to dry.
- Once dry, use a black edible ink pen to draw a smile.

Pluto

Supplies I used:
- Peanut butter candy melts
- Fondant (ears)
- Black candy or icing color (ears)
- Black rainbow chip sprinkle (nose)
- White and black confetti sprinkles (eyes)
- Black edible ink pen

Directions:
- Shape cake like Pluto's face. Freeze to firm.
- Melt peanut butter candy. Insert a lollipop stick and let dry completely. Dip cake pop in candy. Attach a black rainbow chip sprinkle for the nose and let dry.
- Shape fondant ears and set aside. Dye with black color if needed.
- Using a toothpick, dab with candy and attach white confetti sprinkles for the eyes. Dab the bottom of the white confetti sprinkle and attach the black confetti sprinkles. Dab one side of the head and hold a fondant ear in place. Repeat on the other side.
- Use a black edible ink pen to draw a smile.

I forgot to include his whiskers when I originally made this cake pop. You can easily add chocolate jimmie sprinkles or cut black licorice and attach by dabbing with candy and holding in place.

Goofy

Supplies I used:
- White, orange, green and yellow candy melts
- Fondant (ears)
- Black candy color
- White and black confetti sprinkles (eyes and teeth)
- Black rainbow chip sprinkle (nose) 
- Black edible ink pen


Directions:
- Shape the cake balls like Goofy's face. Shape his hat with cake (you can also use candy - Tootsie Rolls, Starburst, etc.)
- Shape ears out of fondant and set aside. I made marshmallow fondant and it worked great. Dye with black coloring. You can also use candy here.
- Melt white candy and add black candy to get desired color. Dip a lollipop stick and insert in head shaped cake. Let dry completely. Dip cake pop in black candy and let dry.
- Melt yellow and green candy to match the color of the hat. Dip the hat shaped piece and set aside to dry.
- Melt white and orange candy to make peach. Using a toothpick, fill in the snout part of the face. Attach a black rainbow sprinkle for the nose.
- Use a toothpick to dab melted candy and attach the white confetti sprinkles for the eyes. Dab the bottom of the white confetti sprinkle and attach the black confetti sprinkle to create pupils. Dab one side of the face and attach a fondant ear, hold in to secure. Repeat on the other side. Attach the hat to the top of the head.
- Use a black edible ink pen to draw a rim on the hat and a smile.
- Break two white confetti sprinkles to create a straight edge. Dip in peach candy and attach teeth.

Thursday, March 29, 2012

Donald & Daisy


Supplies I used:
- White, blue and purple candy melts
- Black candy color (if you can't find dark blue candy melts)
- Blue and black confetti sprinkles (eyes)
- Yellow Starburst candy (beak)
- Lavender and black edible ink pens

Directions:
- Shape cake into ovals. Melt white candy. Insert lollipop stick and let dry. Dip cake pop in white candy and let dry completely.
- Shape Daisy's bow and freeze. Melt lavender candy and dip, set aside to dry.
- Shape Donald's hat in to a teardrop hat and freeze. Melt blue candy (add some black to darken if you don't have a dark blue candy), set aside to dry.
- Melt a yellow Starburst candy for 10sec in the microwave. Folded in half (to get the lips) and shaped to look like a beak. Curve it to fit the cake pop. Careful not to melt the cake pop too much as the heat from the Starburst can transfer.
- Attach mini blue confetti sprinkles for the eyes and black confetti sprinkles for the pupils. Use a toothpick and dab melted candy to hold in place.
- Use a purple edible pen to draw eyelids for Daisy. Use a black edible pen to draw eyelashes. Attach the bow to Daisy's head and attach the beak using melted candy.
- Attach the hat to Donald's head and attach the beak using melted candy. Using a black edible pen, draw a rim around the bottom of the hat. Use a toothpick to add some white between his head and the hat to create hair.

Mickey & Minnie Mouse

Basically the same cake pops as my previous Mickey & Minnie cake pops but with faces!


Supplies I used:
- White, orange and pink candy melts
- Black candy color

- White and black confetti sprinkles (eyes)
- Black rainbow chip sprinkles (nose)
- Black edible ink pen

I did the cake pops according to Bakerella's instructions - but made a bow out of cake and dipped in place of using sprinkles for Minnie. I wanted to keep the proportions true to the cartoon. Plus they don't make jumbo heart sprinkles in purple or yellow (for Daisy and Clarabelle). And my OCD wouldn't let me have some in cake and some in sprinkles... It was really hard to do! Next time, I'll use Starbursts or something and shape it and glue to the cake pop. Dipping small pieces of cake is not my forte.

I do not know how Bakerella gets her candy to set so smoothly. Maybe I should really try using a squeeze bottle like the site suggests but I just don't really want to deal with washing a bottle, lol. I'm so lazy! I dabbed the peach candy in the center and used a toothpick to guide it to shape the faces. If someone knows how to smooth out candy on cake pops, holla!

Mickey Mouse Clubhouse

Tony's been trying to get me to sell cake pops but I refuse. His coworker requested Mickey Mouse cake pops and he tried to sell them for $2 each! Crazy... I told him to give them to her because the quality of these didn't turn out great. Once we decided to give them to his coworker, the pressure instantly released and I just didn't let my OCD get the best of me!

I tried using air in a can to speed up the drying process on some of these cake pops, not realizing that there is bitterant in air in a can now (damn druggies are messing everything up!) and it totally messes up the cake pop. Well, it's OK for those who just like to look at them. I would highly suggest against eating it. Unless you like that bitterant taste.

Hello Kitty Faces


My brother's girlfriend, Yie, turned 24 recently. She loves Hello Kitty, so I decided to make her some cake pops as part of her gift. Instead of just plain faces, I made a bunch of different ones.

Same directions as the previous post for Hello Kitty cake pops except, instead of using nonpareils for the eyes, I drew them to make them more oval. 


Stuff I Used:
- White candy melts
- Jumbo heart sprinkles (bow)
- Red mini M&Ms (bow)
- Yellow rainbow chip sprinkles (nose)
- Pink heart sprinkles (eyes)
- White chocolate chips (ears)
- Black edible ink pen 

To make the different faces:
- WINK: use a toothpick to outline on a U shape for one eye and trace with a black edible pen.
- LOVE: use a toothpick to dab melted chocolate and attach two small pink hearts.
- MAD: use a toothpick to outline eyelashes in a sideways V shape and trace with a black edible pen.
- NERD: use a toothpick to outline the glasses and trans with a black edible pen.


Wednesday, March 14, 2012

Zoe Zebra

Stuff I used:
- White candy melts
- Pretz (broken in to 1/4" pieces for the ears)
- Royal icing eyes
- Pink mini confetti sprinkle (nose)
- Black and pink edible pen

Directions:
- Roll cake in to an oval. Freeze for 15min and move to the fridge.
- Melt white candy in a bowl. Dip a lollipop stick and insert in the cake cone. Dip Pretz pieces and insert ears. Let dry completely.
- Once dry, dip the cake pop. Shake off the excess. Before the candy dries, position the nose.
- Let the pop come down to room temperature and use a toothpick to outline the strips. Use a black edible pen to fill in the stripes. Color one ear only. Draw on the smile with a pink edible pen.
- Use a toothpick to dab a little melted candy and attach eyes.

Susie Sheep

Stuff I used:
- White candy melts
- Pretz (broken in to 1/4" pieces for the ears)
- Royal icing eyes
- Pink rainbow chip sprinkle (nose)
- Pink mini confetti sprinkles (cheeks)
- Pink edible pen

Directions:
- Roll cake in to an oval. Freeze for 15min and move to the fridge.
- Melt white candy in a bowl. Dip a lollipop stick and insert in the cake cone. Dip Pretz pieces and insert ears. Let dry completely.
- Once dry, dip the cake pop. Shake off the excess. Before the candy dries, position the eyes, nose and cheeks.
- Let the pop come down to room temperature and draw on the smile with a pink edible pen.

Rebecca Rabbit

I've made Rebecca Rabbit before, but just to keep my blog consistent (and my OCD happy), I'll briefly recap.

Stuff I used:
- White and yellow candy melts
- Pretz (broken in to 1.5-2" pieces for the ears)
- Royal icing eyes
- Pink rainbow chip sprinkle (nose)
- Pink mini confetti sprinkles (cheeks)
- Pink edible pen

Directions:
- Roll cake in to a cone. Freeze for 15min and move to the fridge.
- Melt white candy in a bowl. Add a few yellow wafers to create a cream colored candy. Dip a lollipop stick and insert in the cake cone. Dip Pretz pieces and set aside to dry. Let dry completely.
- Once dry, dip the cake pop. Shake off the excess. Insert the dipped Pretz ears. Before the candy dries, position the eyes, nose and cheeks.
- Let the pop come down to room temperature and draw on the smile with a pink edible pen.

Pedro Pony


Stuff I used:
- Peanut butter candy melts
- Pretz (broken in to 1/4" pieces for the ears)
- Royal icing eyes
- Pink mini confetti sprinkle (nose)
- Yellow mini confetti sprinkles (spots)
- Black edible pen

Directions:
- Roll cake in to an oval. Freeze for 15min and move to the fridge.
- Melt peanut butter candy in a bowl. Dip a lollipop stick and insert in the cake ball. Dip Pretz pieces and insert ears. Let dry completely.
- Once dry, dip the cake pop. Shake off the excess. Before the candy dries, position the eyes, nose and spots.
- Let the pop come down to room temperature and draw on the smile with a black edible pen.

Emily Elephant

Emily Elephant was definitely the hardest and came out the ugliest of the bunch. At certain angles, she doesn't look too bad. And at other, she looks downright inappropriate! On the upside, you get more cake pop than an average cake pop so it's a wash, haha!

Stuff I used:
- White and lavender candy melts
- Jumbo confetti sprinkles (ears)
- Royal icing eyes
- Pink mini confetti sprinkles (cheeks)
- Black edible pen

Directions:
- Roll cake in to an ball. Roll another small piece of cake to shape the trunk. Smash the two together to postion the trunk. Freeze for 15min and move to the fridge.
- Melt white candy in a bowl. Add a few lavender wafers to get the desired color. Dip a lollipop stick and insert in the cake ball. Dip jumbo confetti sprinkles and insert ears. Let dry completely.
- Once dry, dip the cake pop. Shake off the excess. Before the candy dries, position the eyes and cheeks.
Press on the trunk (undipped) and hold to attach. Once it is dried on, dip the trunk to cover. If you can't reach the base (where it touches the cake ball), use a toothpick to completely cover.
- Let the pop come down to room temperature and draw on the stripes on the trunka and smile with a black edible pen.

Danny Dog

Stuff I used:
- Light cocoa candy melts
- Jumbo heart sprinkles (ears)
- Royal icing eyes
- Pink mini confetti sprinkles (cheeks)
- Black rainbow chip sprinkle (nose)
- Black edible pen

Directions:
- Roll cake in to an oval. Freeze for 15min and move to the fridge.
- Melt light cocoa candy in a bowl. Dip a lollipop stick and insert in the cake ball. Dip jumbo heart sprinkles upside down (so the point is not dipped) and insert ears. Let dry completely.
- Once dry, dip the cake pop. Shake off the excess. Before the candy dries, position the eyes, cheeks and nose.
- Let the pop come down to room temperature and draw on the smile with a black edible pen.

Candy Cat


Stuff I used:
- Orange candy melts
- Jumbo heart sprinkles (ears)
- Royal icing eyes
- Pink mini confetti sprinkles (cheeks)
- White jimmie sprinkles (whiskers)
- Red mini heart sprinkle (nose)
- Brown edible pen

Directions:
- Roll cake in to a ball. Freeze for 15min and move to the fridge.
- Melt orange candy in a bowl. Dip a lollipop stick and insert in to cake ball. Dip jumbo hearts upside down (so that the point is not dipped) and insert as ears. Let dry completely.
- Once dry, dip cake pop in orange candy. Shake off excess. Before the candy dries, position eyes, cheeks, nose and whiskers. Let dry completely.
- Let the cake pop come down to room temperature. Draw on smile with brown edible pen.

Tuesday, March 13, 2012

Peppa, George, Mommy & Daddy Pig

Peppa, George, Mommy Pig & Daddy Pig are all the same with small detail changes. Peppa and George are the exact same. I think a way to differentiate them would be to add on some clothes (printed on cardstock?) or their Teddy or Mr Dinosaur toys.

Stuff I used:
- Pink candy melts
- Pretz (broken in to small pieces, abuot 1/4" for the ears)
- Royal icing eyes
- Pink mini confetti sprinkles
- Black, brown and pink edible ink pens


For Peppa & George- Shape cake balls into ovals and shape out a snout. Freeze for 15min and move to the fridge.
- Melt pink candy in bowl. Dip a lollipop stick and insert in the bottom of a cake ball. Insert two pieces of Pretz at the top of the cake ball for the ears. Let dry completely.
- Once dry, dip the entire cake ball in the pink candy. Shake off the excess. Before the candy dries, place two eyes at the top of the pop (I align with the ears) and two pink mini confetti on the sides for the cheeks. Let dry completely.
- Let the cake pops come to room temperature and use the pink edible pen to draw two nostrils and a smile.

For Mommy Pig
- Same as Peppa/George but also draw on eyelashes with the black edible pen.

For Daddy Pig- Same as Peppa/George but also draw on glasses with the black edible pen (I used a toothpick to outline and then draw - my freehand is terrible).
- Use the brown edible pen to draw on his whiskers. It's hard to see in this photo but it's all in the details!

Peppa Pig & Friends

Since I didn't make dinner last night, I decided to bake a cake and make cake pops. Why the hell not?

I was going to try to redo Dora but just wasn't feeling it. Noah was awake (aka, I'd have him pulling at my leg) and I wouldn't have a steady hand. So I asked Nana if she wanted me to make Peppa Pig and her friends. Of course! Again, why the hell not?

I asked her which characters she wanted me to make. She named the main characters and then busted out with other ones (Candy Cat, Mr Zebra the Mailman, Granny and Grandpa Pig - pretty random considering they aren't in many of the shows). You should never underestimate the memory of a smart 3year old!

What Nana wants, Nana gets. Although I didn't do the Granny Pigs or the mailman. Haha!


Peppa Pig and Friends - Cake Pop-erized!


Dora the Explorer


I tested Dora cake pops to see if it was doable for Fefe's upcoming 3rd birthday party.

They turned out OK but it was a lot of work!

I found a picture of Dora and used it to shape the cake balls to look like her hair.

Then I put wax paper over the picture and piped out the eyes (brown first, then the whites), the mouth (with red), then the face (peach). I gobbed peach in the middle and used a toothpick to drag it out to fill the face. Put in the fridge to dry.

Stick the Dora head with a lollipop stick and let it dry. Then dip it completely in dark cocoa candy melts. Shake off the excess and before it dries, find the flatter side of the pop and push on the Dora face. Try to position it the same as the picture.

Once the cake pop is dry, draw on the details of her face. It makes a HUGE difference. Trace the eyes, the mouth, dot a pupil on each eye, and draw on a itty bitty nose.

I only made two - and each of my kids ate one within 5min of completion!

Monday, March 5, 2012

Woody


What I used:
- Dark cocoa, orange and white candy melts
- White mini confetti sprinkles (eyes)
- Mini rainbow chip (nose)
- Peach jumbo confetti sprinkles (ears)
- Black edible ink pen

Directions:
- Shape cake in to an oval. Flatten the top where the hat will sit. Freeze for 15min and move to the fridge.
- Melt dark cocoa candy in a ziplock bag. Pipe rounded triangles for the hat, big enough to sit on top of the pop, on to wax paper. To make the top of the hat, you can cut candy to shape and dip. What I did was layers of candy, letting it dry in between each layer. A lot of work... if you can find triangle shaped candy - use that! Attach top of hat to base. Let dry.
- Melt orange and white candy to make peach, try to match the peach of the jumbo confetti. Dip lollipop stick and push in to bottom of cake. Dip rainbow chip and position nose. Let dry completely.
- Dip cake pop in peach candy. Shake off the excess. Before it dries, insert ears on both sides. Position eyes. Position hat. Let dry completely.
- Using the handle of a spoon, dab on the hair. Make sure to include his sideburns! Let dry.
- Draw on pupils, eyebrows and smile.